This tutorial will cover the process of creating a basic Joomla module from an existing widget. We’re going to take a widget from Mixcloud, learn how to convert it into a Joomla module and, finally, distribute the extension to JED (Joomla Extension Directory).
If you’ve never created a Joomla module before, this article is the best place to start!
Step 1: Setting up Our Files

Basic Files
For every module created for Joomla, there are two files that absolutely need to be present. One file is a configuration XML file that will hold the module details and parameters and a PHP file that will control our module. For the purpose of this tutorial, we will create a folder calledmod_mixcloud_widget and, within it, using your favorite code editor, create mod_mixcloud_widget.php and mod_mixcloud_widget.xml. Before we move on to the next step, create a single HTML file named index.html.The index.html file that was created will be used to hide the contents of the module folder when viewing via a browser.Template Files
Now that you’ve added the core files, it’s time to add the template files. We do this by creating a folder calledtmpl. Within that folder, we create default.php and index.html. The file default.php will be the module template that will take generated information and output them into clean HTML format on the page.Language Files
Lastly, while inside our root module folder, we create a new folder calledlanguage. This folder will have two files: en-GB.mod_mixcloud_widget.ini and en-GB.mod_mixcloud_widget.sys.ini which will be used to make our module internationable with the option of having different languages.Final File Structure
After following each step, you should have the following file structure- language/en-GB.mod_mixcloud_widget.ini
- language/en-GB.mod_mixcloud_widget.sys.ini
- tmpl/default.php
- tmpl/index.html
- index.html
- mod_mixcloud_widget.php
- mod_mixcloud_widget.xml
Step 2: Setting Up Our XML File
Each Joomla Extension installed has an XML file, which is referred to as a manifest or Install file. This file contains metadata details, such as author, version, description etc. It is also used as a configuration file for module prameters. For the purpose of this tutorial, we will be creating a manifest file for a Joomla 2.5 module. Add the following snippet to your XML file.<?xml version="1.0" encoding="utf-8"?> <extension type="module" version="2.5" client="site" method="upgrade"> <name>MOD_MIXCLOUD_WIDGET</name> <author>B4ucode</author> <creationDate>May 2012</creationDate> <copyright>Copyright (C) 2011 - 2012. All rights reserved.</copyright> <license>GNU General Public License version 2 or later;</license> <authorEmail>info@b4ucode.com</authorEmail> <authorUrl>www.b4ucode.com</authorUrl> <version>1.0.0</version> <description>MOD_MIXCLOUD_WIDGET_XML_DESCRIPTION</description>The primary tag
extension has a few attributes:- type: Tells Joomla what type of extension is being installed, in this case
module. - version: Instructs the installer what version of Joomla we are creating the module for.
- method: There are two options:
newandupgrade. We will be using upgrade, in case of any future updates to the module, it will simply upgrade what is currently there. - client: Instructs whether the module is a front-end or back-end module.
Module Files
As mentioned before, the manifest file holds information about the files used in the module. During installation, Joomla checks the manifest file for all the files that should be added to the system. If any of the files are missing, then Joomla will give an error explaining the files that are missing. Any files found in the module, that aren’t listed in the XML file are not added to the system with the others. Add the following snippet to your manifest file.<files> <filename module="mod_mixcloud_widget">mod_mixcloud_widget.php</filename> <folder>tmpl</folder> <filename>index.html</filename> <filename>mod_mixcloud_widget.xml</filename> </files>
Instead of writing a line for each file in a folder, we simply use the folder element. This element will instruct the installer to install all the files in this folder.
Language Files
This element holds the language files that are to be installed with the module. For the purpose of this tutorial, only one language will be used. When there are more languages, you can simply change the prefix of the files and the tag attribute to the exact language based on the Joomla framework.<languages> <language tag="en-GB">language/en-GB.mod_mixcloud_widget.ini</language> <language tag="en-GB">language/en-GB.mod_mixcloud_widget.sys.ini</language> </languages>
Adding Parameters
Some extensions don’t work right out of the box, but need certain settings added: these settings are called, parameters, and are defined in the manifest file.The first element is
config which holds other elements that will be displayed in HTML format. The element called field is the meat of our parameters where you can define what type of form data you wish to display. This element at its basic level is made up of some core attributes:- type: Type of form field like text, textarea, checkboxes, radio and calendar.
- name: The name element of the form field to displayed.
- default: Default value of the field.
- label: Text displayed at the beginning of our form field.
- description: Description that will be shown in a tooltip when hovering on our form field There are different attributes as they vary per form field type like size, filter, exclude, directory and more.
<config>
<fields name="params">
<fieldset name="basic">
<field type="text" name="feed" default="" label="MOD_MIXCLOUD_WIDGET_FEED_TITLE" description="MOD_MIXCLOUD_WIDGET_FEED_DESC" />
<field name="color" type="color" default="" label="MOD_MIXCLOUD_WIDGET_COLOR_TITLE" description="MOD_MIXCLOUD_WIDGET_COLOR_DESC" />
<field name="width" type="text" default="300" size="40" label="MOD_MIXCLOUD_WIDGET_WIDTH_TITLE" description="MOD_MIXCLOUD_WIDGET_WIDTH_DESCRIPTION" />
<field name="height" type="text" default="300" size="40" label="MOD_MIXCLOUD_WIDGET_HEIGHT_TITLE" description="MOD_MIXCLOUD_WIDGET_HEIGHT_DESCRIPTION" />
</fieldset>
<fieldset
name="advanced">
<field
name="layout"
type="modulelayout"
label="JFIELD_ALT_LAYOUT_LABEL"
description="JFIELD_ALT_module_LAYOUT_DESC" />
<field
name="moduleclass_sfx"
type="text"
label="COM_moduleS_FIELD_moduleCLASS_SFX_LABEL"
description="COM_moduleS_FIELD_moduleCLASS_SFX_DESC" />
<field
name="owncache"
type="list"
default="1"
label="COM_moduleS_FIELD_CACHING_LABEL"
description="COM_moduleS_FIELD_CACHING_DESC">
<option value="1">JGLOBAL_USE_GLOBAL</option>
<option value="0">COM_moduleS_FIELD_VALUE_NOCACHING</option>
</field>
</fieldset>
</fields>
</config>
</extension>
You may notice that we have written labels and description in some uppercase characters like MOD_MIXCLOUD_WIDGET_FEED_TITLE. These are strings that we will make translatable when creating our language files. Finished XML File
If you’ve followed thus far, you should have a completed XML File like following<?xml version="1.0" encoding="utf-8"?>
<extension type="module" version="2.5" client="site" method="upgrade">
<name>MOD_MIXCLOUD_WIDGET</name>
<author>B4ucode</author>
<creationDate>May 2012</creationDate>
<copyright>Copyright (C) 2011 - 2012 Open Source Matters. All rights reserved.</copyright>
<license>GNU General Public License version 2 or later;</license>
<authorEmail>info@b4ucode.com</authorEmail>
<authorUrl>www.b4ucode.com</authorUrl>
<version>1.0.0</version>
<description>MOD_MIXCLOUD_WIDGET_XML_DESCRIPTION</description>
<files>
  <filename module="mod_mixcloud_widget">mod_mixcloud_widget.php</filename>
  <folder>tmpl</folder>
  <filename>index.html</filename>
  <filename>mod_mixcloud_widget.xml</filename>
 </files>
<languages>
  <language tag="en-GB">language/en-GB.mod_mixcloud_widget.ini</language>
  <language tag="en-GB">language/en-GB.mod_mixcloud_widget.sys.ini</language>
 </languages>
<config>
  <fields name="params">
   <fieldset name="basic">
    <field type="text" name="feed" default="" label="MOD_MIXCLOUD_WIDGET_FEED_TITLE" description="MOD_MIXCLOUD_WIDGET_FEED_DESC" />
    <field name="color" type="color" default="" label="MOD_MIXCLOUD_WIDGET_COLOR_TITLE" description="MOD_MIXCLOUD_WIDGET_COLOR_DESC" />
    <field name="width" type="text" default="300" size="40" label="MOD_MIXCLOUD_WIDGET_WIDTH_TITLE" description="MOD_MIXCLOUD_WIDGET_WIDTH_DESCRIPTION" />
    <field name="height" type="text" default="300" size="40" label="MOD_MIXCLOUD_WIDGET_HEIGHT_TITLE" description="MOD_MIXCLOUD_WIDGET_HEIGHT_DESCRIPTION" />
   </fieldset>
   <fieldset
    name="advanced">
    <field
     name="layout"
     type="modulelayout"
     label="JFIELD_ALT_LAYOUT_LABEL"
     description="JFIELD_ALT_module_LAYOUT_DESC" />
    <field
     name="moduleclass_sfx"
     type="text"
     label="COM_moduleS_FIELD_moduleCLASS_SFX_LABEL"
     description="COM_moduleS_FIELD_moduleCLASS_SFX_DESC" />
    <field
     name="owncache"
     type="list"
     default="1"
     label="COM_moduleS_FIELD_CACHING_LABEL"
     description="COM_moduleS_FIELD_CACHING_DESC">
     <option value="1">JGLOBAL_USE_GLOBAL</option>
     <option value="0">COM_moduleS_FIELD_VALUE_NOCACHING</option>
    </field>
   </fieldset>
  </fields>
 </config>
</extension>
Step 3: Creating mod_mixcloud_widget.php
The first thing you want to with your module is to add your copyright notice. If you intend to submit your module to JED [Joomla Extension Directory], you should add some GPL license information.
This is one of the checks done before approving a module into the directory. Directly below this, I use the statement defined('_JEXEC') or die; which is used in most PHP files to protect against hackers. This is also another requirement for approval on JED.
<?php
/**
 * @package  B4ucode
 * @subpackage mod_mixcloud_widget
 * @copyright Copyright (C) 2011 - 2012 B4ucode, Inc. All rights reserved.
 * @license  GNU General Public License version 2 or later;
 */
// no direct access
defined('_JEXEC') or die;
Next, we define our paramaters as variables. Developers sometimes define their paramaters as variables in order to have cleaner template files. In order to call a paramaters we use the $params->get() function and get the param name defined in our manifest file. Finally, we call the module Helper function, getLayoutPath, which will render our module template. The first argument of the function takes the module name that we are trying to call, then the second argument looks for the template we intend to render for that module. In this case, we get the parameter layout and in the second argument we set the default layout to be default. This layout is the exact name of the file that we have in our tmpl folder.
$width = $params->get('width',300);
$height = $params->get('height',300);
$feed = $params->get('feed');
$color = $params->get('color');
$moduleclass_sfx = htmlspecialchars($params->get('moduleclass_sfx'));
require JmoduleHelper::getLayoutPath('mod_mixcloud_widget', $params->get('layout', 'default'));
?>
Finished File
<?php
/**
 * @package  B4ucode
 * @subpackage mod_mixcloud_widget
 * @copyright Copyright (C) 2011 - 2012 B4ucode, Inc. All rights reserved.
 * @license  GNU General Public License version 2 or later;
 */
// no direct access
defined('_JEXEC') or die;
    $width = $params->get('width',300);
    $height = $params->get('height',300);
    $feed = $params->get('feed');
    $color = $params->get('color');
    $moduleclass_sfx = htmlspecialchars($params->get('moduleclass_sfx'));
    require JmoduleHelper::getLayoutPath('mod_mixcloud_widget', $params->get('layout', 'default'));
?>
Step 4: Creating default.php
At this point, we have created our manifest file with paramaters, took those same parameters and turned them into variables. In this step, we are going to use those variables in our template file. The template file will render all of our HTML for the module. Edit default.php from your tmpl folder and add the following snippets:
Copyright Notice and Restricted Access Script
<?php
  /**
 * @package  B4ucode
 * @subpackage mod_mixcloud_widget
 * @copyright Copyright (C) 2011 - 2012 B4ucode, Inc. All rights reserved.
 * @license  GNU General Public License version 2 or later;
 */
 // no direct access
defined( '_JEXEC' ) or die( 'Restricted access' );
It is recommended that you add the Copyright Notice and Restricted Access line to your PHP files.
Adding our HTML
For this tutorial, we will need the embed code from Mixcloud. Here is an example on getting the code . Our module’s purpose is to make the code reusable without having to get the embed each time we want to create or modify a Mixcloud Widget on our site. The default embed code comes with some extra information about the widget content which we don’t need. So for this tutorial, I have stripped it down to just the embed script. Paste this embed code to yourdefault.php file.
<div><object width="480" height="480"><param name="movie" value="http://www.mixcloud.com/media/swf/player/mixcloudLoader.swf?feed=http%3A%2F%2Fwww.mixcloud.com%2FMaryAnneHobbs%2Fthom-yorke-moneyback-mix-xfm-music-response-150911%2F&embed_uuid=5d6c18a4-a837-409e-8cec-23ab44372842&stylecolor=&embed_type=widget_standard"></param><param name="allowFullScreen" value="true"></param><param name="wmode" value="opaque"></param><param name="allowscriptaccess" value="always"></param><embed src="http://www.mixcloud.com/media/swf/player/mixcloudLoader.swf?feed=http%3A%2F%2Fwww.mixcloud.com%2FMaryAnneHobbs%2Fthom-yorke-moneyback-mix-xfm-music-response-150911%2F&embed_uuid=5d6c18a4-a837-409e-8cec-23ab44372842&stylecolor=&embed_type=widget_standard" type="application/x-shockwave-flash" wmode="opaque" allowscriptaccess="always" allowfullscreen="true" width="480" height="480"></embed></object></div>
Making the Script Configurable
If we wanted to embed one widget permanently, we could just zip up the module right now. However we don’t, so we are going to replace some of the attributes with our module params . We’re going to change thewidth, height, color and feed. Paste the following snippet over your embed script.
<div><object width="<?php echo $width; ?>" height="<?php echo $height; ?>"> <param name="movie" value="http://www.mixcloud.com/media/swf/player/mixcloudLoader.swf?feed=<?php echo $feed; ?>&embed_uuid=&stylecolor=<?php echo $color; ?>&embed_type=widget_standard"></param><param name="allowFullScreen" value="true"></param><param name="wmode" value="opaque"></param><param name="allowscriptaccess" value="always"></param><embed src="http://www.mixcloud.com/media/swf/player/mixcloudLoader.swf?feed=<?php echo $feed; ?>&embed_uuid=&stylecolor=<?php echo $color; ?>&embed_type=widget_standard" type="application/x-shockwave-flash" wmode="opaque" allowscriptaccess="always" allowfullscreen="true" width="<?php echo $width; ?>" height="<?php echo $height; ?>"></embed></object> </div>
Take note of how we are just calling the variables from our controller file.
Step 5: Creating Language Files
In step one, you might have noticed that we created a folder, called language, with two files. Then, in step two, we added some translatable text. In this section, we are going to translate that text to English. Insert the following snippet to the ini files,en-GB.mod_mixcloud_widget.sys.ini and en-GB.mod_mixcloud_widget.ini.
; B4ucode
; Copyright (C) 2011 - 2012 B4ucode. All rights reserved.
; License GNU General Public License version 2 or later;
; Note : All ini files need to be saved as UTF-8 - No BOM

MOD_MIXCLOUD_WIDGET="Mixcloud Widget"
MOD_MIXCLOUD_WIDGET_XML_DESCRIPTION="This module displays the Mixcloud Widget using feed and other paramaters"
MOD_MIXCLOUD_WIDGET_ITEMS_LAYOUT_DEFAULT="Default"
MOD_MIXCLOUD_WIDGET_FEED_TITLE="Feed Url"
MOD_MIXCLOUD_WIDGET_FEED_DESC="Add the link to single/cloudcast"
MOD_MIXCLOUD_WIDGET_COLOR_TITLE="Color"
MOD_MIXCLOUD_WIDGET_COLOR_DESC="Add Style color"
MOD_MIXCLOUD_WIDGET_WIDTH_TITLE="Width"
MOD_MIXCLOUD_WIDGET_WIDTH_DESCRIPTION="Width of Widget"
MOD_MIXCLOUD_WIDGET_HEIGHT_TITLE="Height"
MOD_MIXCLOUD_WIDGET_HEIGHT_DESCRIPTION="Height of Widget"
If you look closely, you will notice that the text I used for the parameters now have an English translation. You can add other files and create translations in other languages!
Step 6: Packaging the Module
After following all the steps thoroughly, your module is now installable, but we’d like to make a checklist of things to do before installation and distribution.Add index.html to Folders
It is recommended that you add a index.html file to each folder. This file, as mentioned previously, stops users from viewing the contents of a module folder directly in a browser. Add the following snippet to your files:
<html><body bgcolor="#FFFFFF"></body></html>
Comparing our File Structure to the Manifest File
At this stage, it is recommended that you look at the files and folder defined in your manifest file, and make sure they exist in your module folder. Any file that does not exist can stop the installer from installing files, or, it may throw an error.Packaging
After our little checklist, we can package the module into a zip file, and install it. By navigating to the modules manager, and selecting the module, you can modify the paramaters with your desired width, height, color and song feed.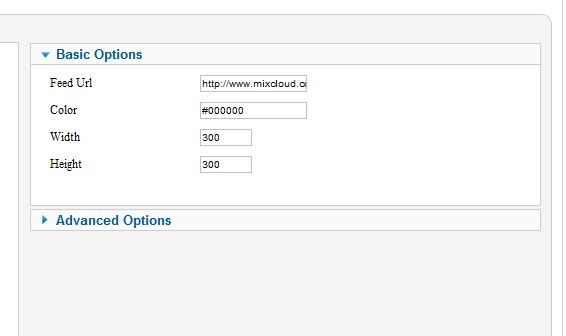
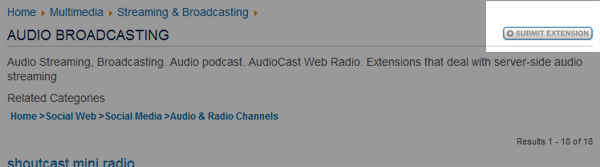
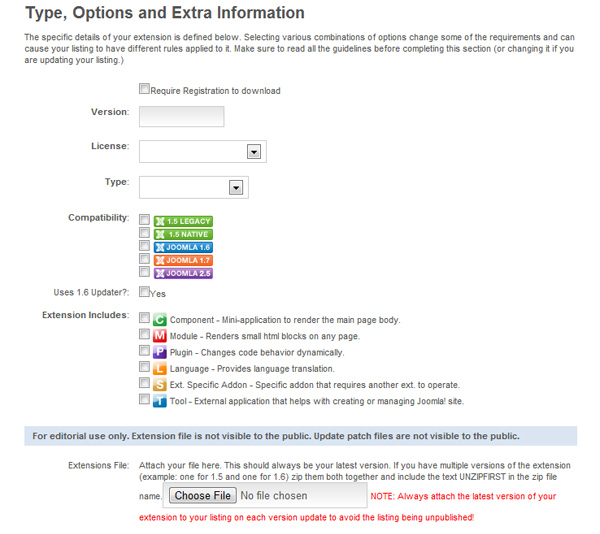
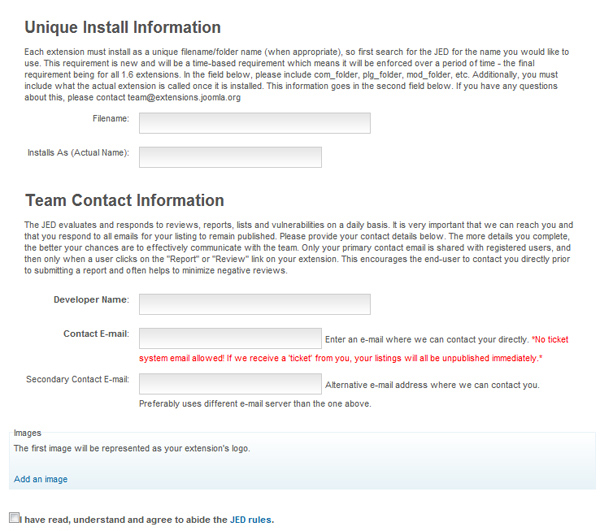
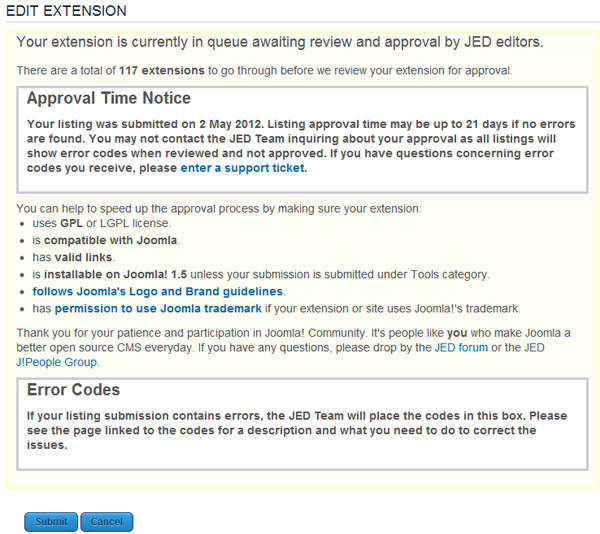
Step 7: Submitting to JED
Locating the Category
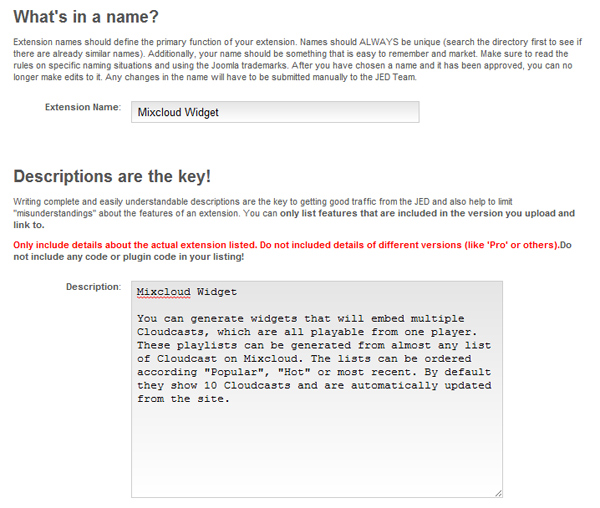
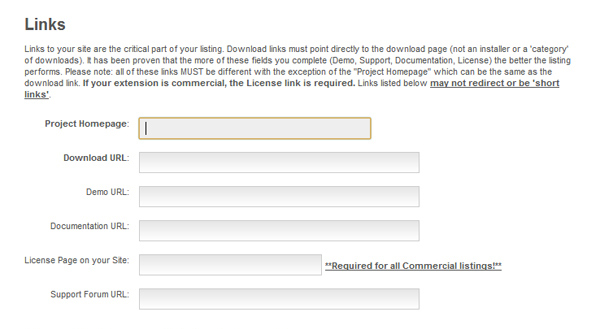
Filling Out the Details
Success Image
No hay comentarios:
Publicar un comentario